Scenario Editing and Modification
Learn how to modify recorded scenarios by deleting or adding steps.
Editing Recorded Scenarios
After recording a scenario, you can modify it by deleting steps or adding new ones. This flexibility allows you to refine your tests without re-recording from scratch.
Deleting Steps
Remove unnecessary or incorrect steps from your scenario.
How to Delete Steps
-
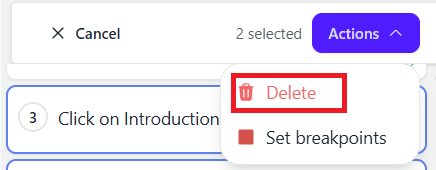
Select the steps you want to delete by clicking on them (you can select multiple steps)
-
Click the delete button
-
The selected steps will be removed from the scenario
Caution: Make sure you don't delete steps that other steps depend on. For example, if step 5 uses data extracted in step 3, deleting step 3 will cause step 5 to fail.
Adding New Steps
Insert new steps into an existing scenario at any position.
How to Add Steps
- Set a Breakpoint: Place a breakpoint on the step where you want to insert new steps. The new steps will be added before this step.
- Start Debug Mode: Click Start in the Debug menu. The scenario will execute up to the breakpoint and pause.
- Begin Recording: Click the Record button.
- Add New Steps: Perform the actions you want to add to the scenario.
- Stop Recording: Click Record again to save the new steps.
Example: Adding Validation Steps
Suppose you have a login scenario, but you forgot to add a step that verifies the user's name appears after login:
- Set a breakpoint on the step after login completes
- Run the scenario up to that breakpoint (it will log you in)
- Start recording
- Switch to Assert mode and click on the username element
- Stop recording
- The assertion step is now inserted into your scenario
Best Practices
- Use breakpoints wisely: Place them at logical points in your scenario where you want to insert new steps.
- Test incrementally: After adding or deleting steps, replay the scenario to ensure it still works correctly.
- Build complex scenarios incrementally: Use the combination of breakpoints and recording to build scenarios step by step, testing each section as you go.